Archive
Linux Server – Task 7: Optimization and Varnish
Course
Linux palvelimena [Linux server] by Tero Karvinen at Haaga-Helia University of Applied Sciences
Task
Measure the speed difference between a local computer WordPress page and a similar static page with the ‘ab’ tool. Install Varnish (an HTTP acceleration tool) – measure the performance of a dynamic web page before and after the installation to gain data about the possible improvements.
Testing environment
OS: Xubuntu Linux 13.10 “Saucy Salamander” 32-bit (persistent live USB drive)
System: HP EliteBook 2570p Notebook PC
Preparing the installation environment
LAMP and WordPress have been installed.
Web server performance
I began testing the performance with Apache’s own benchmarking tool, which I started by entering the following in the terminal emulator (in the command -c means the number of clients, and -n the sent number of requests):
$ ab -c 200 -n 300 http://localhost/~xubuntu/jannevaris.com/|grep -P ‘Failed|#/sec|50%|100%|Length’
The results were as follows:

The command prints an answer, where the size of the document, the number of failed requests, and the number of requests per second.
Next I ran the same command for one of my local WordPress page’s articles:
$ ab -c 200 -n 300 http://localhost/~xubuntu/jannevaris.com/?p=2/|grep -P ‘Failed|#/sec|50%|100%|Length’
The results were similar:

After this I tested a similar static page. First I created a new folder under the public_html folder named “statictest” with $ mkdir statictest. I created an index.html file in the folder with $ nano index.html, to which I copied the source code of my local WordPress’s front page. Then I saved the changes.
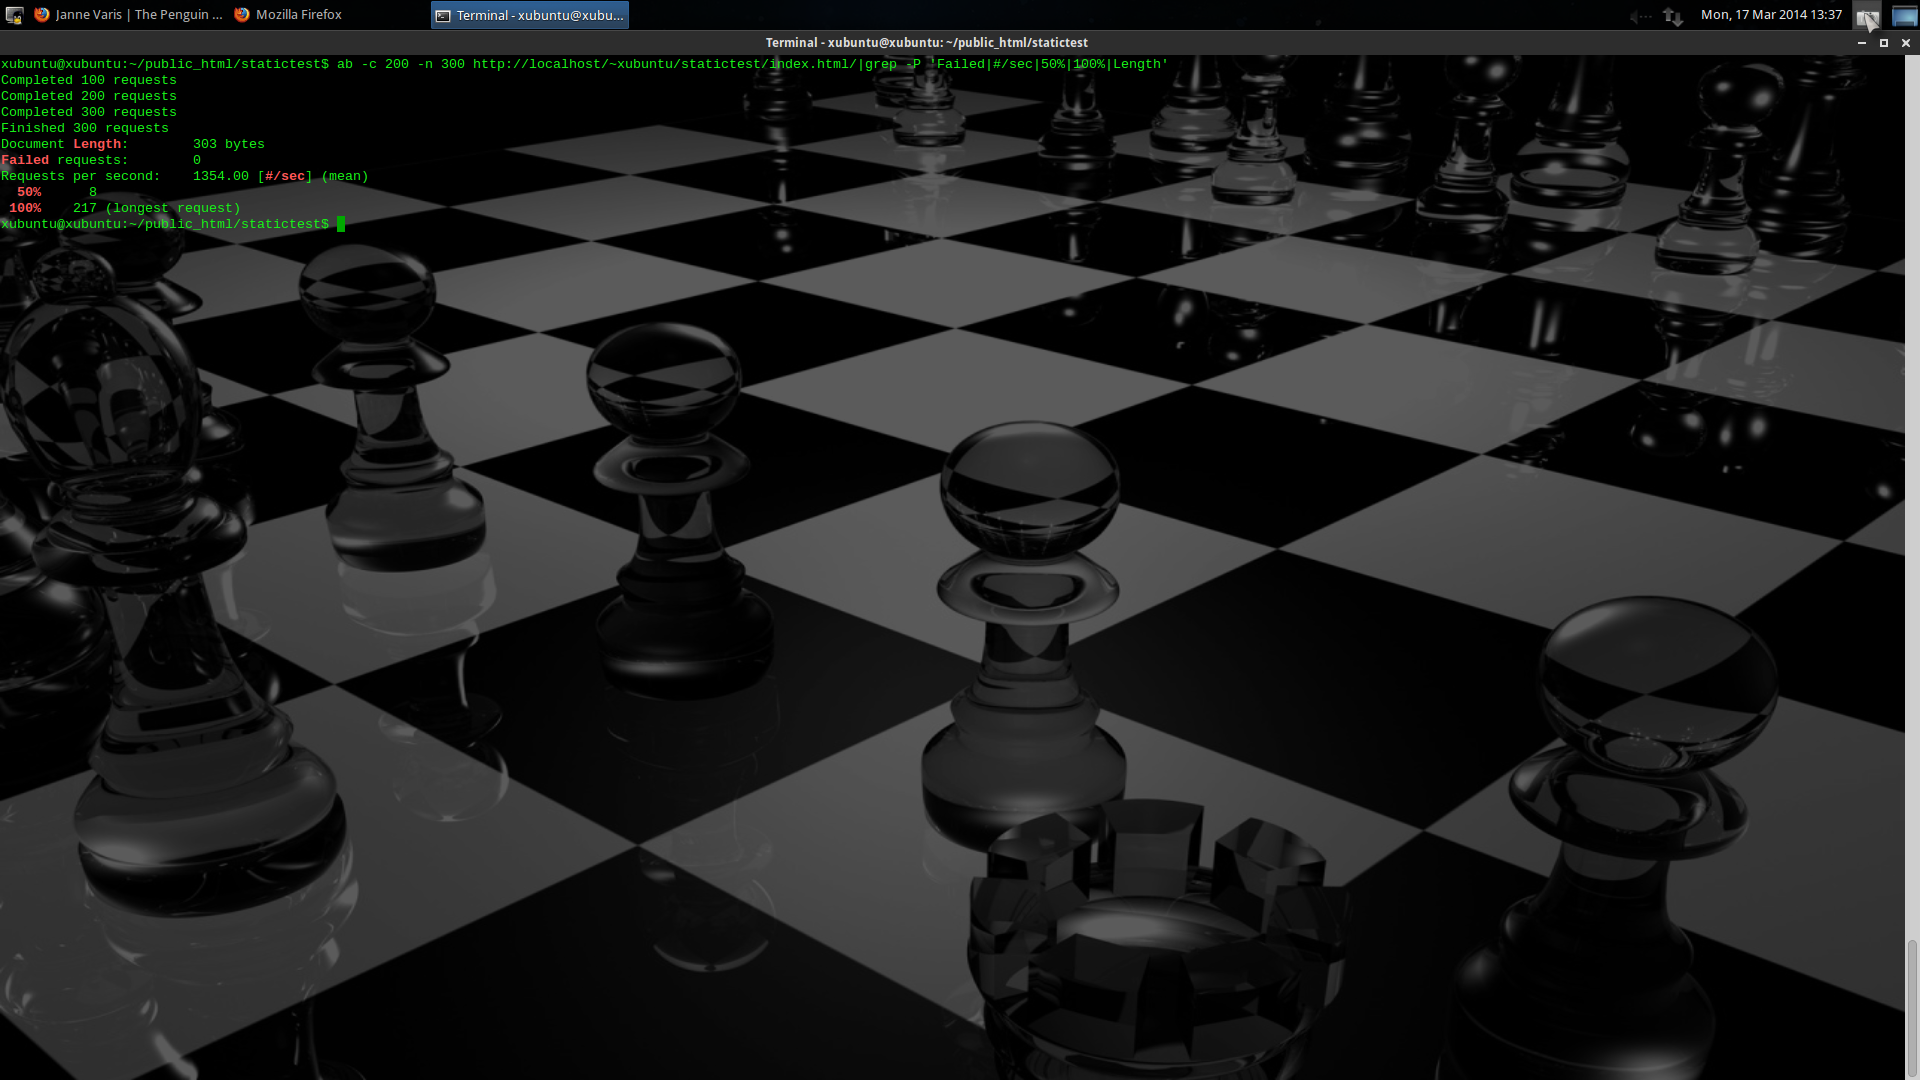
To finish the testing, I ran the same command for the static page:
$ ab -c 200 -n 300 http://localhost/~xubuntu/statictest/index.html/|grep -P ‘Failed|#/sec|50%|100%|Length’
The results showed that the page worked slightly faster when it was static:
Installing Varnish
I installed Varnish with $ sudo apt-get install varnish. After the installation I had to set Varnish to listen to port 80, so I navigated to /etc/default/ with $ cd /etc/default/, and edited the necessary file with $ sudoedit varnish, so that the Alternative 2 part looked like this:
## Alternative 2, Configuration with VCL
#
# Listen on port 6081, administration on localhost:6082, and forward to
# one content server selected by the vcl file, based on the request.
#
DAEMON_OPTS=”-a :80 \
-T localhost:6082 \
-f /etc/varnish/default.vcl \
-S /etc/varnish/secret \
-s malloc,256m”
Then I saved the changes. After this I edited Apache’s port settings by navigating to /etc/apache2/ with $ cd /etc/apache2/, and editing ports.conf with $ sudoedit ports.conf. On the “Listen” line, I changed the port to 8080 and saved the changes.
After this I restarted Apache and Varnish with $ sudo service apache2 restart and $ sudo service varnish restart.
Next I compared the results before and after installing Varnish. I ran the following commands again:
$ ab -c 200 -n 300 http://localhost/~xubuntu/jannevaris.com/|grep -P ‘Failed|#/sec|50%|100%|Length’
$ ab -c 200 -n 300 http://localhost/~xubuntu/jannevaris.com/?p=2/|grep -P ‘Failed|#/sec|50%|100%|Length’
The results show that the requests now happen faster, from which we can determine that the pages have better performance after installing Varnish.


YSlow and Firebug analysis and offered improvements
Yahoo!’s page performance tool YSlow graded the local WordPress front page as A, with an overall performance score of 92. The only features not graded A were:
Grade E on Use a Content Delivery Network (CDN)
There are 5 static components that are not on CDN.
You can specify CDN hostnames in your preferences. See YSlow FAQ for details.
Grade F on Add Expires headers
There are 6 static components without a far-future expiration date.
Firebug’s Net panel came up with no improvement suggestions.
References
WordPress Codex (http://codex.wordpress.org/)
Karvinen, Tero: Lessons 2014-3-10, Linux palvelimena [Linux server] (http://terokarvinen.com/2013/aikataulu-%E2%80%93-linux-palvelimena-ict4tn003-11-ja-12-kevaalla-2014)
About
This document can be copied and edited according to the GNU General Public License (version 3 or newer). http://www.gnu.org/licenses/gpl.html
Based on a course by Tero Karvinen, http://www.iki.fi/karvinen
Linux Server – Task 6: Installing WordPress Et Al.
Course
Linux palvelimena [Linux server] by Tero Karvinen at Haaga-Helia University of Applied Sciences
Task
Install WordPress on top of LAMP (installed previously). Modify the WordPress installation to include selected four customizations from the task list.
Testing environment
OS: Xubuntu Linux 13.10 “Saucy Salamander” 32-bit (persistent live USB drive)
System: HP EliteBook 2570p Notebook PC
Preparing the installation environment
I had already installed LAMP previously using my own instructions (in Finnish). I had also enabled Apache name-based virtual hosting, so I was able to use a www address locally for testing purposes, instead of just typing localhost/~xubuntu/ in the Firefox address bar.
Creating a database for WordPress
I began by logging into the MySQL server monitor by entering $ mysql -u root -p in the terminal emulator. I then created a new database for WordPress with the proper privileges by entering the following command in the terminal prompt:
CREATE DATABASE wpxubuntu;
GRANT ALL PRIVILEGES ON wpxubuntu.* TO wpxubuntu@localhost IDENTIFIED BY "password";
FLUSH PRIVILEGES;
After this I exited the MySQL monitor by typing exit and hitting enter.
Installing WordPress
First I navigated to my www home folder (see Apache name-based virtual hosting) folder by entering $ cd /home/xubuntu/public_html/jannevaris.com in the terminal. Next I downloaded the WordPress tarball with $ wget https://wordpress.org/latest.tar.gz.
I extracted the tarball with $ tar -xf latest.tar.gz, and moved the files in the now-present wordpress folder to the jannevaris.com folder with $ mv wordpress/* ../jannevaris.com/. I then deleted the obsolete wordpress folder and the tarball with $ rm -r wordpress and $ rm latest.tar.gz.
1. I navigated to jannevaris.com in Firefox, and was presented with a page about creating a configuration file:

2. I clicked “Create a Configuration File” to move forward. An instruction page was presented:
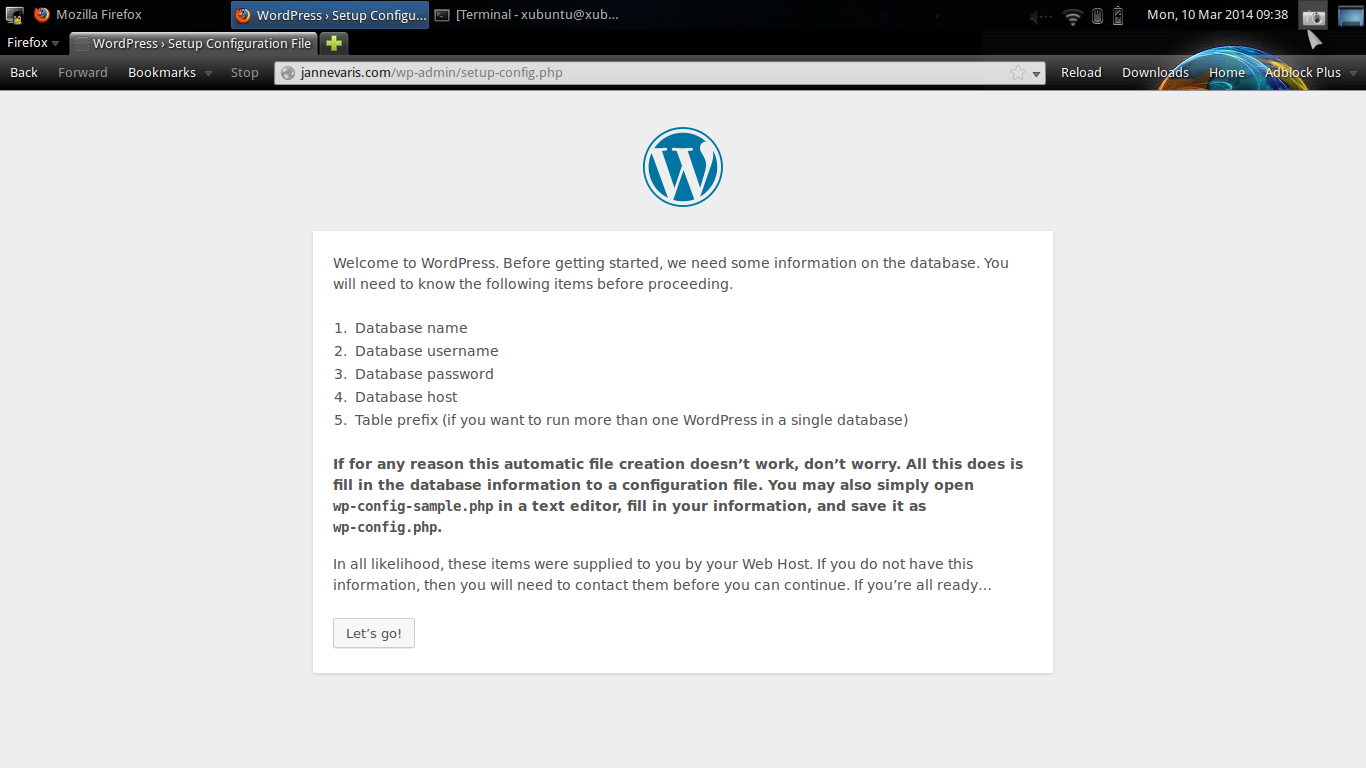
3. I clicked “Let’s go!” to move forward. A database connection details page was presented:

4. I filled in the details and clicked “Submit”. A prompt page followed:

5. I needed to create a WP config file, so I copied the code from the Firefox page and switched back to the terminal emulator, and ran $ ls in the jannevaris.com folder – no configuration file existed yet, apart from a sample named wp-config-sample.php, which I renamed in to wp-config.php by entering $ mv wp-config-sample.php wp-config.php in the terminal.
I opened the file for editing with $ nano wp-config.php and deleted all the existing code, after which I pasted the copied code in the file. I saved the changes and returned to the Firefox page, clicking “Run the install” to move forward.
6. An information-needed page was presented:

7. I filled in the details and clicked the “Install WordPress” button at the end of the page. Success!
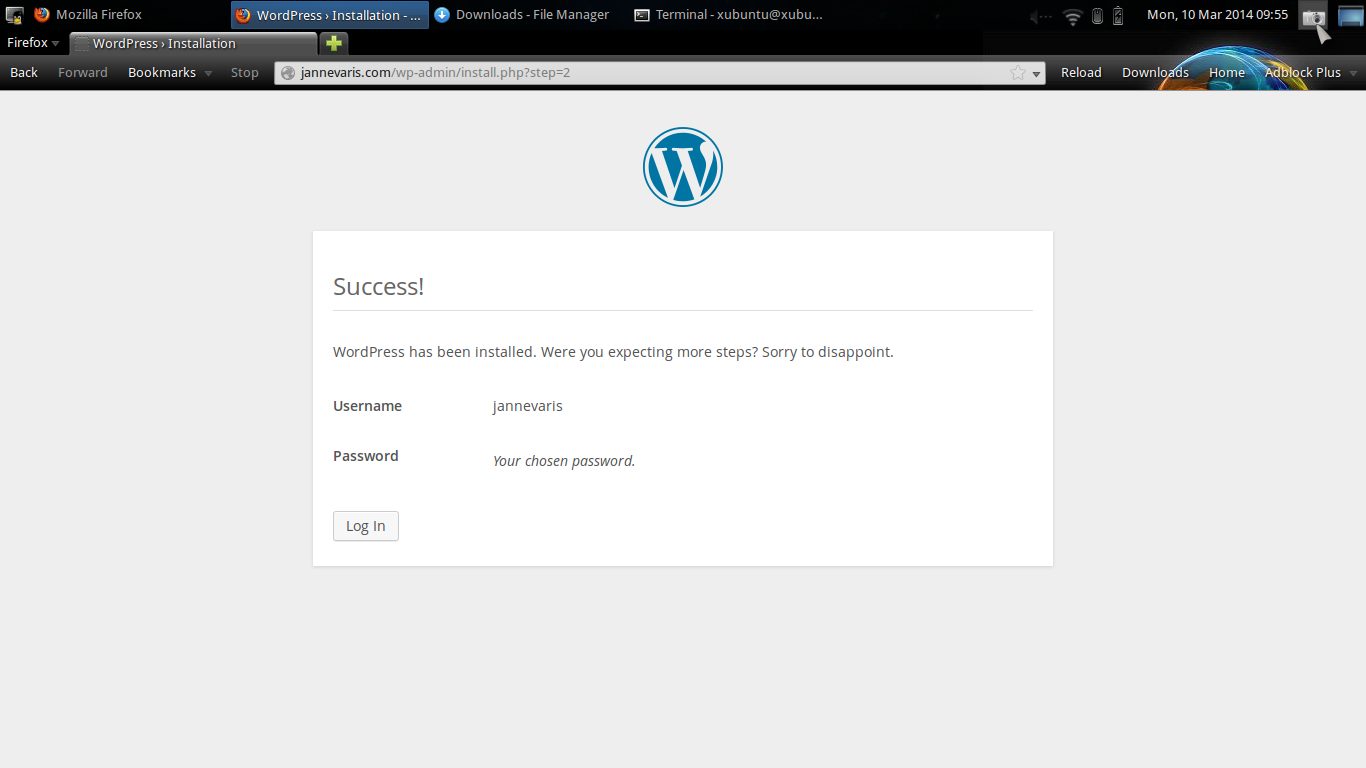
8. WordPress was now installed, and I could now move forwards to the login page:

9. Now I simply logged in and made a test post locally:

10. Task complete.
Enabling permalinks
First I navigated to Settings –> Permalinks in the local WP control panel, then I selected “Day and Name” and saved the changes. To complete the task, I still had to create a .htaccess file in the same folder as the rest of the WP files. I created the file with $ nano .htaccess, and added the code presented by WordPress in the Permalinks options:
<IfModule mod_rewrite.c>
RewriteEngine On
RewriteBase /
RewriteRule ^index\.php$ - [L]
RewriteCond %{REQUEST_FILENAME} !-f
RewriteCond %{REQUEST_FILENAME} !-d
RewriteRule . /index.php [L]
</IfModule>
Then I ran the following in the terminal:
$ sudo a2enmod rewrite
$ sudo service apache2 restart
After this the links worked correctly and looked cleaner, without any extra characters or markers.
Changing the theme
I navigated to the Appearance menu in the WP control panel and selected Themes. After this I changed the active theme to a theme named Twenty Twelve.
Enabling and adding images
Next I wanted to add images to my local WP test site, so I tried uploading one via Media –> Add New in the WordPress control panel. I received the following error:
“os_tux.png” has failed to upload due to an error
Unable to create directory wp-content/uploads/2014/03. Is its parent directory writable by the server?
Which meant that I didn’t have the necessary rights to the folder required the upload process. I fixed the issue by navigating to wp-content in the jannevaris.com folder by entering $ cd wp-content/ in the terminal, and then running $ mkdir uploads and $ chmod 777 uploads/. After this I was able to uploaded the images to my local WordPress installation without any problems, and also attach them to my test posts.
Backing up WordPress content
I made backups of the content via Tools –> Export in the WordPress control panel. Once in the Export menu, I selected “All Content” and then clicked the “Download Export File” button to download the backup file to local folder.
The file format is xml. This particular file was named janne039swordpresstest.wordpress.2014-03-10.xml.
References
WordPress Codex (http://codex.wordpress.org/)
Karvinen, Tero: Lessons 2014-3-3, Linux palvelimena [Linux server] (http://terokarvinen.com/2013/aikataulu-%E2%80%93-linux-palvelimena-ict4tn003-11-ja-12-kevaalla-2014)
About
This document can be copied and edited according to the GNU General Public License (version 3 or newer). http://www.gnu.org/licenses/gpl.html
Based on a course by Tero Karvinen, http://www.iki.fi/karvinen
